Feeds:
Posts
Comments

Archive for the ‘Hunting’ Category


fm1798

“Mount your own antlers!”

M2E1L0-0R350B300

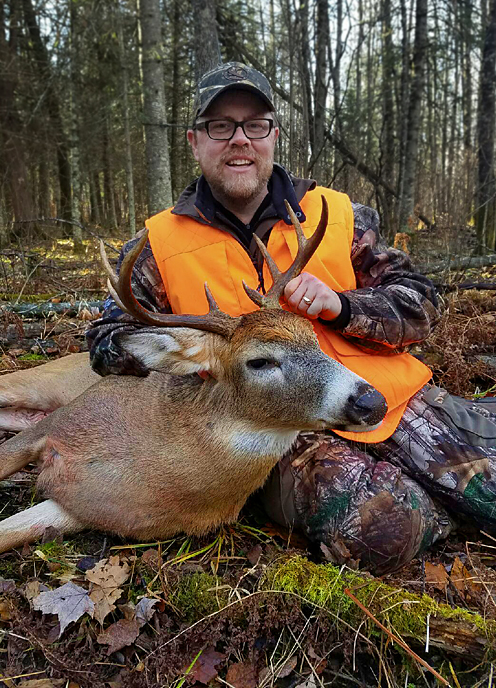
How to Make a European-Style Antler Skull Mount The stars aligned this fall! We put our trial cameras out around June 1st. We left them for two months before checking. We went out earlier in the day and switched-out the USB cards. We returned to the cabin with all eyes glued to the television, as if it where Superbowl Sunday! The sound of holing and hooting soon echoed from our screened-in excitement, as the pictures begin to show what was leaving tracks in our woods! A nice 8-pointer! Not necessarily big enough to head and shoulder mount, but a nice antler mount.

From that day forward, we worked our food plots and spread DEER CAIN, hoping that this dandy-of-a buck wood stick around for fall hunting season.

Sure enough! A half-hour after sunrise this same buck walks within 30 feet of my stand. All are hard work paid off! The hunt doesn’t start on opening day. It starts many months before you hear that first shot!

I called around to see how much it would cost to mount the skull and antlers. Many taxidermist charge around $125 to $150. After researching the web and watching several YouTube videos, I felt comfortable I could tackle this myself.

fm1799Below are my instructions to easily mount the deer head and celebrate the fall harvest with an European-Style Antlers with Skull Mount:

What you will need:

  • Large Pot
  • Powdered Borax
  • Dawn Liquid Dish Washing Soap
  • High-Pressure Washer (Borrow one if you have too!)
  • Board to mount skull (I bought mine from McKenzie Taxidermy Supply)
  • Drywall Anchor to hold the skull to the mounting plate

Instructions:

  1. Remove hide, eyes, nose from skull
  2. Fill and heat a large pot of water (This is very stinky and I recommend doing the cooking outside)
  3. Add a small amount of dish washing detergent and 1-cup of Borax
  4. Bring the water to a very slow rolling boil (Important, otherwise you may lose bone and cartilage)
  5. Do NOT let the antlers rest below the water line. They will become white like the skull if you do! The base of my antlers got a little white, which may happen to you. I used brown shoe polish to hide the discoloration
  6. Slow-boil for 1-hour and dump the water. This first batch of water will be greasy from the meat and brain cooking off the bone
  7. See what you can pull off
  8. Continue to fill the pot and bring to slow boil (adding 1-cup borax and a small amount of liquid detergent)
  9. Soon, the meat will begin to fall of the bone. Use a knife to cut and remove as much as you can
  10. I went through the ear canal with a piece of electrical wire to help breakup the brain
  11. Now comes the fun part! Use a high-pressure washer to remove most of the brain matter and meat tissue. Try not to spray in one spot or to close because nose and teeth bone are delicate
  12. Continue to spray with the pressure washer and/or cook until all meat is removed

fml800It took me a total of 4-hours to complete. You may lose part of the nose cavity. The bones of the nose are very delicate. Simply, glue them on once everything dries.

The next day, I wrapped the antlers with blue painters tape and sprayed the skull with Matte Acrylic Clear Spray to preserve and protect.

I drilled a hole underneath the skull and recessed the head of a Drywall Anchor Bolt through the back of a Walnut Mounting Board. The skull provides easy access where the spine meets the head. Use a Drywall Anchor that expands and tighten against the mounting board.

That’s it!

Fat Man’s Landing, MN
Read Full Post »


This slideshow requires JavaScript.

“What makes me smile!”

Today‘s Featured Trip (Willow Creek Kennels): The weather planned for Saturday was 2-degrees above zero. It was cold — but soon, after huffing and puffing, my shotgun barrel was warm and the dogs went into action.

Little Falls, MN

Read Full Post »


This slideshow requires JavaScript.

“What Keeps Me Coming Back for More!”

I’m at the hunting shack, sharing stories with friends and excited for tomorrow’s hunt. The crisp, cold air fills my mind as the frost on the corn and trees surrounds me. Wishing everyone the best and safe hunting!

Fat Man’s Landing, MN

Read Full Post »


“Ten-Point Buck Antler Shed.”

While searching for Morel mushrooms, I found this antler shed from a ten-point buck. I don’t know who was more surprised, while walking only a few more steps, I could see a large deer running with a doe. Could this be the buck that lost this antler? As I continued my search for Morels, I spotted turkeys, coyotes, owls and Wood Ducks.

Fat Man’s Landing, MN

Read Full Post »


“I’ve Seen God Paint!”

A beautiful fall day hunting.

Fat Man’s Landing, MN

Read Full Post »


Finding Deer Antlers in Minnesota Woods

Some call it luck…I call Fate. This fall, my buddy Brian and I walked the trails hunting for grouse only to find this ivory memento of a large eight-point buck.

Congratulations! What A great find!

Fat Man’s Landing, MN


Read Full Post »


A Star-of-a-buck in Starbuck, Minnesota.

Whether it’s “First blood gets the deer” or “The person who makes the killing shot?” In either case, it’s not an easy answer.

My friend hunts private property near Starbuck, MN. He usually hunts a fence line dividing two fields. On this day, the neighbors were hunting close by, so he decided to hunt the adjacent woods. From his stand he heard a shot and watched as the neighbors drag a doe to their vehicle. While watching the hunters, a massive buck moving slowly, through tall switchgrass, caught his eye! The deer was between my friend and the other hunters. As the deer moved passed the other hunters, a safe shot presented itself. He took the shot and the deer dropped! You can imagine how excited he was! He yelled from his stand, “I have a big buck down!” The other hunters walk in his direction as my friend climbed down from his stand. The hunters and my friend walked towards the deer from opposite sides — at 30-yards the deer gets up and starts to run. A hunter from the other party shoots and hits the spine — killing the deer.

The Loaded Question?
Later inspection, my friend had hit the deer in the hind quarter. It was a deer of a lifetime! A huge 11-point buck worthy of a wall mount!

As everyone stood around the deer, the question came up, “So who’s deer is it anyways?” The hunter who shot the second time felt it was his deer. My friend feels that if he had not called the others over — that he would have had a second shot.  In the end, my friend decided it wasn’t worth arguing over and walked away the better man.

So what do you think? Please share your thoughts.

Read Full Post »


Read Full Post »


Each year, the summer heat lifts and the first fall breeze fills my head with excitement. This is a time for hunters, near and far, to dial in their groups, rig decoys, ready their best four-legged friend and put the finishing touches on the gear. Yes! This is a magical time — when we reflect on seasons past and prepare with anticipation for this years harvest.

With the 2011 hunting season upon us, there’s no better time then RIGHT NOW to start setting goals.

Having yearly goals is a great way to achieve success.

The same principles translate to everyday life. When we focus on something important — something we really want to achieve and work hard towards, we truly maximize our potential. From a hunting standpoint, you’ll soon realize that by doing this, you gain much more from the experiencee of planning. Before you know it — your skills, knowledge and overall enjoyment of the outdoors has also increased!

The goals you set — whether it’s herd management, shot proficiency, gaining greater knowledge or simply forming a better attitude; the fact is…it makes you a better hunter! The next step is to recognize what’s realistic (especially with the amount of time you have to invest with each goal).

For as long as I can remember, I’ve set goals for each season. Because I have new goals, I’ve matured as a hunter and a man. I remember some of my earliest goals: “Shoot my first grouse” or “hear a buck grunt.” Even as a bright-eyed youngster, I became less concerned with killing the buck I saw chasing a doe, but rather —  THRILLED with seeing the whole experience! I realized that it isn’t so much about the destination, as it is the journey getting there.

There are many ways to measure success. If you fall short of reaching your goal — what matters most is the experience you gain and lessons learned in the process. It will certainly give you a sense of accomplishment and a better outlook on what it means to “pursue game.”

Whether you enjoy chasing fur, fins or feathers — start setting seasonal goals and before-long, you’ll start to experience what I like to call, “Increased Hunting Success!”

Read Full Post »


So what is the best waterfowl ammo? I hear this question a lot, so I decided grab my trusty Remington 870 and pattern the new 2011 steel loads myself. Last year — Black Cloud was a big-hit (no pun intended). In 2011, Winchester is introducing a new load called, “Blind Side.”  I purchased the top six waterfowl loads for 2011 and shot them into a 30-inch circle at 30 yards. Here is a list of what I tested:

Winchester (Blind Side) 3-inch, #2 and BB
Federal (Black Cloud) 3-inch, #2 and BB
Remington (HyperSonic) 3-inch, #2 and BB
Hevi-Shot (Hevi-Metal) 3-inch,  #2 and BB

A pellet in the wing doesn’t count as a Kill Shot

Together, I shot a total of 16 times; 8 each (#2’s and BB) with improved cylinder and modified chokes. I then took a picture of the large pieces of paper and increased the contrast so that you could see the pellet holes. I then counted all the shot inside the 30-inch circle.

What I found is Black Cloud is still the superior load at 30-yards. The pattern is very tight. I counted a total of 10 pellets within the Kill Zone. You will see that the improved cylinder choke with BB is a killer! Next was Black Cloud with #2’s (8 pellets in the Kill Zone) using IC choke. It was interesting to see that the Winchester’s Blind Side did not do as well with the improved cylinder choke tube, but I DID noticed the increased number of pellets! The third runner-up was Hevi-Shot’s, Hevi-Metal with #2 (6 pellets in the Kill Zone) and a modified choke — I also notice that Hevi-Metal was 10 less pellets then Winchester’s Blind Side! Less noticeable, was Federal’s HyperSonic with OK number in the Kill Zone, but found the pattern wide — even with the modified choke.

Read Full Post »


Come visit Twin Cities Outdoor Adventures Group (TCOA) new site. It’s the best way to connect with other outdoor enthusiasts!

Located in the heart of the Twin Cities Metro area, TCOA consists of a growing number of outdoor enthusiasts who thrive on sharing new experiences, while building camaraderie with others who also appreciate the great outdoors.

Get Off the Couch

If it’s exercise you’re after…come breath in the fresh, clean air and feel rejuvenated. Join us in planning fun-filled activities such as hiking, biking, camping and many other exhilarating outdoor pleasures.

Outdoor Learning Activities

If you’re interested in knowing more about the outdoors…growing TCOA connections in the community have led to a plethora of learning opportunities, including how-to camping seminars, wildlife identification field trips, local geocaching events and more.

The Right Gear

Having the proper equipment is essential to every safe, successful outdoor experience. If you’re a little low in the outdoor gear department, don’t worry. TCOA’s 1000-plus membership allows us to pool our efforts, so participants have access to the appropriate equipment for their event. Additionally, local sponsors offer informative seminars highlighting equipment, tips and techniques to further ensure that our outings proceed as planned.

Community-Grown Success Starts with our Members
As the foundation of our growth and success, TCOA members are committed individuals who generously share knowledge, volunteer and help plan outdoor activities while engaging others to do the same.

Join us in pursuing our mutual passion for the outdoors! FREE! Join TODAY!

Read Full Post »


Read Full Post »


“Coyotes Mousin”

Picking my daughter up from skiing, we came across coyotes looking for lunch.

FML Outdoors picture of the Day

Read Full Post »


“The Gods Must Be Hungry!”

A special occasion centered around the enjoyment of the outdoors and to celebrate the fall harvest with friends; once again we gather to tantalize our taste buds with unique dishes — all cooked with wild game. Starting with a variety of appetizers, such as Pickled Dried Venison with Home-made Wine Cheese and Pickled Northern Pike served with Pineapple Infused Vodka. Leaving our guests guessing, we sampled (for some, their first time) Dove Pate and Pheasant White Chili. The main course was Bacon-Wrapped Venison Tenderloin served over Garlic Mash Potatoes and my own steak sauce, made from reduced stock and carmelized onions.

It only goes to show that….the Gods must have been hungry when they create wild game, because it sure is good!

Read Full Post »


To me, the history of the Juicy Lucy hamburger comes from the “Grill” and coffee shop in New Brighton, MN, which has been closed now for well over 35 years! Many local folks passing through town, especially the locals who hung out there for most of their lives, remember the Famous Grill and the most wonderful woman Marge who was famous for her mouth-watering burgers. She was a treasure and permanent fixture in that town. Sadly she’s been gone a long time. I had the pleasure of working with her in the 70’s. Marge kept me on my toes at the New Brighton Municipal! Many try to copy her burger — few succeed! If my memory hasn’t failed me…here is how her recipe goes:

Ingredients:

  • 3 lbs of extra lean burger
  • American cheese
  • Swiss cheese
  • finely chopped onion
  • salt/pepper to taste

Make a normal sized hamburger patty and place 2 slices of  fresh American cheese and 1 slice of Swiss cheese and as much chopped onion as possible on top, then add another hamburger patty and carefully seal the cheeses/onion inside. In a large heavy skillet place each burger and cook. After turning once, poke burger with a toothpick to let out steam, taking care NOT to lose any cheese (this is the tricky part). Cooking a 1/3 pound burger without letting the juice, cheese and onions run out takes talent! Serve on a buttered bun with all the condiments! For me, that is a true Juicy Lucy!

A writer for Matt’s Bar has this on his blog: A recipe from John T. Edge’s book Hamburger & Fries. (The Juicy Loosey)

Ingredients:

  • 1 tablespoon Worcestershire sauce
  • Cheese
  • 3/4 teaspoon garlic salt
  • 4 buns
  • Finally, add your favorite condiments and toppings

Procedure

  1. Place beef, Worcestershire sauce, garlic salt, and pepper in a bowl; mix well. Portion into eight even balls of meat. Shape each portion into a thin round patty that’s slightly larger than the cheese slice.
  2. Fold cheese slices in half twice, so you have a little stack of quartered cheese slices. Place a folded cheese stack on four individual patties, covering cheese with remaining four patties.
  3. Tightly crimp the edges of the patties together to form a tight seal.
  4. Did you make a tight seal? I hope so, because it needs to be TIGHT to avoid a blowout as the cheese melts and creates steam. The cheese will try to find its way out of its meaty prison!
  5. Preheat a cast-iron skillet or heavy-bottomed pan to medium heat (or fire up a medium-hot bed of coals on your backyard grill) and cook burgers over heat 3 to 4 minutes on first side. Burger may puff up due to steam from melting cheese. This is normal. Do not be alarmed.
  6. Flip, and using toothpick, prick top of burger to allow steam to escape. Allow burger to cook 3 to 4 minutes on this side.
  7. Remove patties from pan or grill. Bun those suckers, slap some condiments on, and dig in.

Other suggestions I may offer….If you have ground venison, go right ahead and give it a try. But, you better add ground pork, so those edges will pinch together and hold as you flip your burgers.

Read Full Post »

Older Posts »